Building My Own Custom React
@superlucky84|September 4, 2022 (4y ago)1,489 views

I frequently use React, a JavaScript framework, at work. With React, I can simplify code that would otherwise require a lot of effort to implement with pure JavaScript. It feels almost like magic.
Although React is incredibly convenient, there are times when I still feel a sense of fear. The fact that React feels like magic means I don't fully understand how it works, and I know that when issues arise, I’ll struggle to resolve them on my own.
I’ve tried to learn through technical blogs and various documents to address fragmented questions, but despite these efforts, React still feels like magic (and fear) because I haven't grasped the framework well enough.
To understand React well enough to use it without worry, I had a desire to implement code that behaves like React. As I studied and built it in my spare time, I ended up creating my own version of a 'fake' React.
After finishing it, I felt a sense of joy. I wanted to share what I learned and spread the happiness.
Implementing a Transpiler for Template Syntax
I implemented a transpiler that converts HTML tag-like expressions into function calls, similar to JSX. Since this implementation was aimed at studying React, I made the syntax resemble JSX.
Let's start by learning about JSX.
Understanding JSX
JSX is a syntax extension for JavaScript. It is a string with a special set of rules where JavaScript and HTML-like expressions are mixed.
To use JSX in practice, you need to create a JavaScript parser that understands tag syntax. This parser should then be connected to a transpiler, like Babel or esbuild, to convert it into a form that can be executed in the browser.
The HTML tag portions of JSX strings are transformed into function call forms. By utilizing the fact that functions are executed in order according to the HTML hierarchy, a virtual DOM can be created.
While studying JavaScript parsers and creating an extension for JSX syntax parsing would have been helpful, I had other higher-priority areas to focus on. So, this time, I decided to create a simple transpiler that parses tag-like strings and converts them into function call-style strings.
Parsing Template Strings
First, I looked at the code of open-source projects like vuejs and svelte to see how other template syntax parsers are implemented (imitation is the mother of creation).
I discovered that most open-source code uses a string cursor and tree data structures to implement syntax parsing. Although I didn’t dive deeply into the code, I got the general idea of how it works. Once I felt confident that I could implement it myself, I started writing the code without overthinking it.
The goal was to analyze tag strings and transform them into function calls. By setting step-by-step goals for the parts I envisioned, I was able to achieve the desired result after four stages of processing.
Since I started this with the goal of studying JSX, it naturally ended up having a user interface similar to JSX. However, since JSX is an extension of JavaScript syntax, it allows the direct use of JavaScript constructs like if statements and loops. My implementation, on the other hand, was created using simple string transformations, so I replaced if statements and loops with special attributes (directives) within the tags.
Below is a brief summary of the four-stage process I used to parse template strings.
Stage 1 — Analyzing the String and Creating a Tag Tree
The goal of Stage 1 is to convert an original HTML-like string, as shown in the example below, into a tree structure object that represents the parent-child relationships of the tags.
Looking at the converted object, the s property contains the full attribute string, including the tag name, while hasChildren is a boolean value indicating whether the tag has any child tags. The children property holds the actual information about the child tags.
Original String
`<div class="root">
  <button onClick={handle}>one{two}three</button>
  <button onClick={handle2}>onetwothree</button>
  <button onClick={handle3}>cc</button>
</div>`
Resulting Object
{
  s: 'div class="root"',
  hasChildren: true,
  children: [
    {s: 'button onClick={handle}', hasChildren: true, children: Array(1) }
    {s: 'button onClick={handle2}', hasChildren: true, children: Array(1) }
    {s: 'button onClick={handle3}', hasChildren: true, children: Array(1) }
  ]
}
Stage 2 — Identifying Tag Name and Attributes in a Tag Node
The next step is to analyze a node in the tree and separate the tag name from the attribute string.
{
  tagName: "div"
  props: "{ lass: \"root\" }"
  hasChildren: true
  children: Array(3)
    0: {tagName: "button", props: "{ onClick: handle }", hasChildren: true, children: Array(1) }
    1: {tagName: "button", props: "{ onClick: handle2 }",  hasChildren: true, children: Array(1),  }
    2: {tagName: "button", props: "{ onClick: handle3 }", hasChildren: true, children: Array(1),  }
}
Stage 3 — Separating Simple Strings and Expressions in Text Nodes
Since I originally envisioned a template syntax mimicking JSX, strings within curly braces are considered JavaScript expressions.
As shown in the text property of the example code, text content is separated into expressions and plain text by commas. Plain strings are enclosed in single quotes, while expressions are not enclosed in any quotes.
Original String
`<div class="root">
  <button onClick={handle}>one{two}three</button>
  ...
</div>`
Resulting Object
children: [
  {
    tagName: 'button',
    props: '{ onClick: handle }',
    hasChildren: true,
    children: [{ texts: "'one', two, 'three'", children: Array(0) }],
  },
  ...
]
Stage 4 — Generating Function Call Strings Based on the Completed Tag Tree
Stage 4 involves traversing the tree created by the transformations up to Stage 3 and generating function call-style strings.
The final completed result is shown below.
h(
  'div',
  { class: 'root' },
  h('button', { onClick: handle }, 'one', two, 'three'),
  h('button', { onClick: handle2 }, 'onetwothree'),
  h('button', { onClick: handle3 }, 'cc')
);
The actual implementation can be found in the repository.
Connecting to Vite.js
I had never used tools other than Webpack or Babel before, so I felt a bit limited. This time, I decided to study and use Vite.js.
Therefore, I connected the completed transpiler via a Vite.js plugin. I created it by simply adding a function that modifies the basic example of Vite.js. Although it’s quite minimal, it works as intended (though more considerations would be needed to make it ready for actual production use).
Below is the resulting code. As you can see, I extracted the string inside the <template> tag and replaced it with the desired string using replace.
import { parse } from '@wwact/compiler';
const fileRegex = /\.(wwx)$/;

export default function myPlugin() {
  return {
    name: 'vite:wwx',

    transform(src, id) {
      if (fileRegex.test(id)) {
        const code = src.replace(
          /<template>((.|[\/S\/s])*)<\/template>/ms,
          (_m, template) => {
            return parse(template);
          }
        );

        return {
          code,
          map: null, // provide source map if available
        };
      }
    },
  };
}
I decided to use the .wwx extension to represent the template syntax. However, after implementing it, I ran into the issue that syntax highlighting for the .wwx extension and autofix via Prettier (a tool I like to use) do not work correctly for this new extension.
As a workaround, I configured my editor to treat the .wwx extension like .js, and I replaced Prettier's autofix with ESLint's autofix to get around this limitation.
Creating a Virtual DOM
A virtual DOM is a JavaScript object in a tree structure. JSX is transformed by a transpiler into function calls. According to the hierarchical structure of the user-defined JSX tags, a function called h is executed. Therefore, if the framework implementer properly implements the h function, a virtual DOM that preserves the hierarchy of the user-defined tags can be created.
As shown in the example code below, the first argument of the h function is the tag name, the second argument is the tag's attributes, and from the third argument onwards, the h functions for the child nodes are defined in sequence. For example, if a tag has three child tags, the function call representing that tag will have five arguments.
In order to create the desired virtual DOM by implementing the h function, it's important to understand the execution order of the h function. In the example below, the execution order of the h functions will be as follows: the li tag with item1, the li with item2, ul, div, and finally, section.
h(
  'section',
  null,
  h(
    'div',
    { class: 'wrap' },
    h('ul', null, h('li', null, 'item1'), h('li', null, 'item2'))
  )
);
<section>
  <div class="wrap">
    <ul>
      <li>item1</li>
      <li>item2</li>
    </ul>
  </div>
</section>
First Argument
The first argument of the h function can be of three types. As shown in the example code above, when the expression is in HTML form, it is defined as a string. When it is a Fragment or a Component, it is defined as a function.
The implementation of the h function and the Fragment function is the responsibility of the framework creator, while the implementation of the component function is up to the framework user.
Below is the Fragment function I implemented. The type property of the returned object is set to fragment, and it returns the children property containing the child tag nodes.
function Fragment(_props: Props, ...children: WDom[]) {
  return { type: 'fragment', children };
}
The following example shows how the h function is transformed based on the type of the first argument. As you can see, the first argument for the Fragment and Component versions of the h function is the function itself.
<Fragment>
  <Custom />
  <div>ss</div>
</Fragment>
h(Fragment, null, h(CustomElement, null), h('div', null, 'ss'));
Let's take a look at the structure of the object created when the Custom component is executed in the example below.
export default function Custom() {
  const data = useState({ k: 1 });

  return (
    <Fragment>
      <button>{data.k}</button>
      <div>ss</div>
    </Fragment>
  );
}
{
  "type":"fragment",
  "children":[
    {
      "type":"element",
      "tag":"button",
      "props":{},
      "children":[ { "type":"text", "text":1 } ],
    },
    {
      "type":"element",
      "tag":"div",
      "props":{ },
      "children":[ { "type":"text", "text":"ss" } ],
    }
  ],
}
Creating the Actual DOM from the Virtual DOM
After implementing h and Fragment to complete the desired virtual DOM, the virtual DOM alone is not useful. It needs to be converted into an actual DOM.
The code below is an example of how to turn a virtual DOM into a real DOM. By recursively calling toDom, the virtual DOM tree is traversed, and the real DOM is created.
The code is simple: based on the type of the virtual DOM, it creates fragment, element, or text nodes. The child nodes are also created in the same way, and they are appended to their parent node using appendChild.
function toDom(vDom) {
  let element;
  const { type, tag, text, props, children = [] } = vDom;
  const isFragment = type === 'fragment';

  if (isFragment) {
    element = new DocumentFragment();
  } else if (type === 'element' && tag) {
    element = document.createElement(tag);
  } else if (type === 'text' && isExisty(text)) {
    element = document.createTextNode(text);
  }

  const elementChildren = children.reduce((acc, childItem) => {
    acc.appendChild(toDom(childItem));

    return acc;
  }, new DocumentFragment());

  element.appendChild(elementChildren);

  return element;
}
Updating the Virtual DOM
Creating a New Virtual DOM from the State Change Point
When a component's state changes, a new virtual DOM is created with the updated component as the root.
Let's look at the image below. When a change starts from the red node, all the child nodes, represented by the blue section, are also dependent on the data and must be recreated.
The reason for regenerating the virtual DOM is to compare it with the existing one and decide how to reflect the changes in the real DOM (e.g., whether to create and replace the element entirely or just change its attributes, etc.).
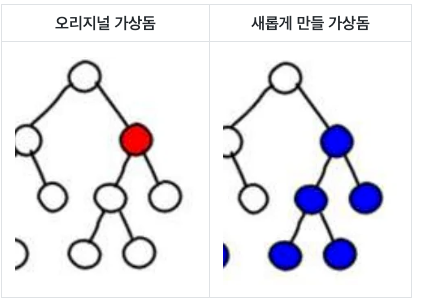
To recreate the virtual DOM for the blue nodes, we need to re-run the component function corresponding to the red node.
When creating a new node, it is important to pass the current state of the existing node so that the updated state is reflected in the new node. The state refers to values created with useState.
For example, let's assume that the component creation function corresponding to the red node in the image above is CustomRoot, as shown in the example code below.
When the valueA value of CustomRoot changes, we can determine that the root node of the newly created virtual DOM is the same as the root node of the original virtual DOM (meaning it should be updated rather than replaced).
However, the first child of the root node could be either CustomA or CustomB, depending on whether valueA is odd or even. This makes it difficult to assume that the new node will always be the same as the original node. In such cases, we need a rule (a diff algorithm) to compare the original node and the new node to determine whether they are the same or different.
fucntion CustomRoot() {
  const [valueA] = useState(1);

  return () => (
    <div>
      { valueA % 2 === 0 ? <CustomA /> ?  <CustomB />}
      <span>node</span>
    </div>
  )
}
Only when the nodes are determined to be the same as the original node, the values will be inherited and the node will be updated. If the nodes are determined to be different, a new virtual DOM will be created without inheriting the data.
Diff Algorithm
I implemented the diff algorithm by referring to the React documentation.
Once I grasped the key points, I found that implementing the diff algorithm wasn't as difficult as I initially thought.
The key is to approach it from a deterministic perspective. The structure of the virtual DOM created from the same component function is already determined in advance by the component's state (state values), and it can take on a few predictable forms.
For example, in the code below, the number of child nodes created from the Custom function is always 2. Depending on the value of valueA, the first child node could be customA or null. However, if null itself is treated as a virtual DOM with a type of null, the number of child nodes created by Custom will always be 2.
fucntion Custom() {
  const [valueA] = useState(1);

  return () => (
    <div>
      { valueA % 2 === 0 ? <CustomA /> ?  null}
      <span>node</span>
    </div>
  )
}
Therefore, the newly created virtual DOM will always have a similar structure to the existing virtual DOM, and by comparing nodes that are at the same depth and in the same order only once, the diff algorithm can be implemented.
By comparing nodes at the same depth and in the same order, if they are determined to be the same, only the properties affected by the component's state change will be updated, and child nodes will be compared in the same way. If the nodes are determined to be different, all child nodes can be considered new nodes and will be replaced entirely.
Below are the virtual DOM comparison cases that I considered.
-
Cases where child nodes need to be completely replaced:
- When the tag name or component function is different.
- When it's a Fragment and the number of child nodes is different.
-
If the case doesn't match point 1, inherit the state from the original node, update the props, and then compare the children in the same manner:
- If the props and state are the same as the original virtual DOM after a shallow comparison, the children are not replaced, and the process ends.
- If the props and state are different from the original virtual DOM after a shallow comparison, compare the children in a loop.
-
For loop-type child nodes, compare the
keyvalues to determine whether they are the same.
Delaying Creation
When creating a new virtual DOM, if the entire tree is recreated all at once, the child trees cannot be properly compared. This is because the shape of the virtual DOM tree can change depending on the state the component has when the component function is executed.
Let's look at the example below.
"The structure of the child tree changes based on whether the valueA prop is even or odd.
Additionally, when encountering a node with a component function, such as custom2, the child tree created from Custom2 may differ entirely based on the component’s props or state values.
Therefore, when traversing the hierarchy to create a new tree, if a node with a component function is encountered, the function execution should be delayed. This is because if the component function is executed before evaluating the conditions in the virtual DOM comparison cases 1 and 2, it will not be possible to create the node with the correct state or props values passed from the original node, as explained in the cases above."
function Custom1(props){
  const { valueA, valueB } = props;

  return (
    <div>
      {
        valueA % 2 === 0 : (
          <ul>
            <li>{valueB}</li>
            <li>2</li>
          </ul>
        ) : (
          <Custom2 valueA={valueA + 1} />
        )
      }
    </div>
  );
}
Inheriting Values from Old Components
How should the state be passed between the original virtual DOM node and the new node?
There can be several approaches to this. I used a method where a specific component node is linked with the state value through a Symbol.
To help explain, I’ve written a scenario where the state value is reused.
- A unique
Symbolvalue is defined before the component function is executed. - When the component function is executed, the
useStatefunction is also executed within the component. - It is possible to determine which component function the
useStatefunction is executed in, and the correspondingSymbolvalue for that component. - The
Symbolvalue corresponding to the component function is used as the key for thestatecreated byuseState. - During re-rendering, when the component function is executed again, the
Symbolvalue from the original node is passed, and the linked state is found and reused.
Here is the pseudocode for useState to help clarify. The value object manages the state values of the components. Since it uses the Symbol corresponding to the component node as the key, by passing the Symbol value of the original node to the newly executed component function, state value transfer between the original and new nodes can be implemented.
const value = {};
const useState = (initValue, vdomKey = Symbol()) => {
  if (!value[vdomKey]) {
    value[vdomKey] = initValue;
  }

  const setData = newValue => {
    value[vdomKey] = newValue;
  };

  return [value[vdomKey], setData];
};
Using Closures Without Inheritance
In addition to using Symbol values for state inheritance, I also considered other approaches.
One such method is to maintain state, variables, and methods used within the original component function as closures when updating the virtual DOM.
Instead of directly executing the component function for re-rendering, we can define the tag portion as a function (as shown in the code below) and, when virtual DOM re-rendering is necessary, use the function instead of the component function. This way, we can reuse the state or variables used in the original node through closures without any additional code.
function Custom(props) {
  const [valueA, setValueA] = useState(7);

  return () => (
    <Fragment>
      <button onClick={() => setValueA(valueA + 1)}>increase</button>
      <Custom2 valueA={valueA} />
    </Fragment>
  );
}
Implementing useState
I once read on a tech blog that useState can be implemented using closures. The code below is my own implementation of useState, based on what I had learned.
let value;

const useState = initValue => {
  if (!value) {
    value = initValue;
  }

  const setData = newValue => {
    value = newValue;
  };

  return [value, setData];
};

export default function CustomElement(props, children) {
  const [v, setV] = useState(props.vava);
  ...
}
The key points of the above code are as follows:
- For mounting, the component function is executed, and
useStatewithin the component function is called, setting the initial value (initValue) tovalue. - For component updates, when the component function is executed,
useStateretrieves thevaluevariable set by the closure.
Upon writing this code, I realized that there are two major issues:
- When multiple
useStatecalls are made in a single component, there is only onevalue, so only a single value can be handled. - When a single component function creates multiple components, the above code has a single
valuein the module, so it can't handle multiple components properly.
Solution for the First Problem
The following code solves the case where multiple useState calls are executed within a single component.
The value has been changed to an array to store multiple state values. Additionally, the stateCallSeq value, which holds the execution order, is used as a key to set and retrieve the state.
const value = [];
let stateCallSeq = 0;

const useState = (initValue, vdomKey) => {
  const currentSubSeq = stateCallSeq;

  if (!value[currentSubSeq]) {
    value[currentSubSeq] = initValue;
  }

  const setData = newValue => {
    value[currentSubSeq] = newValue;
  };

  stateCallSeq += 1;

  return [value[currentSubSeq], setData];
};

export default function CustomElement(props, children) {
  currentSubSeq = 0;
  const [v, setV] = useState(props.vava);
  const [k, setK] = useState(props.vava);
  ...
}
Solution for the Second Problem
The following code solves the second problem. The value that manages the state has been changed to an object, so it can handle values for multiple components. The key is expanded based on the component's key.
const value = {};
const useState = (initValue, componentKey) => {
  if (!value[componentKey] || !value[componentKey][currentSubSeq]) {
    value[vdomKey] ??= [];
    value[vdomKey][currentSubSeq] = initValue;
  }

  const setData = newValue => {
    value[componentKey][currentSubSeq] = newValue;
  };

  stateCallSeq += 1;

  return [value[componentKey][currentSubSeq], setData];
};
In addition, to make it work with an interface similar to React's useState, several additional processes need to be handled. The code I prototyped can be found in the [repository].
Updating the Real DOM
The next step is to reflect the updated virtual DOM into the real DOM.
Below, I've outlined the seven cases in which the virtual DOM should be compared and updated into the real DOM.
1. (REPLACE). If there was an original node to compare, but the new node is not of the same type, replace the element at that position.
When performing a virtual DOM diff, if the original node exists but the generated tag name differs from the original, making it a different node, we replace the original element with a new one.
2. (ADD). If there is no original node to compare, treat it as a new DOM node to be added.
In the case of the previous (REPLACE) scenario, all the child nodes must be treated as new nodes that need to be added. A new HTML element is created and appended.
3. (UPDATE). If the original node exists and is of the same type, update only the DOM attributes, and if it is a text node, replace the text.
If the original node and the newly created node are determined to be of the same type through the diff algorithm, only the attributes or properties of the HTML element are updated. In the case of a text node, the text is replaced.
4. (DELETE). If the original node exists, but the newly created node has a null type, delete the DOM.
If the original node exists, but the new node is of type null, the corresponding DOM element should be deleted.
5. (SORTED-REPLACE). For loop types, even in the case of REPLACE, the order might change based on the key value, so instead of simply replacing the existing DOM at the current position, it should be reinserted and sorted.
For child nodes created by a loop, instead of comparing nodes in the same order, all key values at the same depth are compared to find matching key values.
Even in the case of a REPLACE, we cannot guarantee that the original node and the new node are in the same order in the tree. Therefore, for loop-type child nodes, they are not directly replaced at the same position. Instead, they are first removed from the real DOM, and then a new DOM is created and inserted at the correct sorted position using an insertion sort method.
6. (SORTED-UPDATE). For loop types, even in the case of UPDATE, the order may change based on the key value, so the element should be reinserted and sorted.
This situation is similar to the case 5 (SORTED-REPLACE), but in this case, we need to perform an UPDATE instead of a REPLACE.
While keeping the original DOM in place, the order must be sorted again. Therefore, the element is temporarily removed from the real DOM and then reinserted into the correct position to ensure proper order.
7. (NONE). For text nodes, if the text is the same, no change is needed, so it is left as is.
In the case of text nodes, if the text of the original node and the new node match, no update is performed. This is handled as a NONE type, as explained in step 2–1 of the diff algorithm.
Conclusion
Through the process above, I have completed my own custom framework.
Since it was created solely for learning and experimentation, its completeness and usability are still lacking. However, having taken the first step, I hope that with continued study, I can create something better.
For me, React is no longer magic. It's just an interesting piece of JavaScript.
You can check out the completed code in my GitHub repository.